
Installation
This guide is not a replacement for the Installation instructions page, which contains more details on some points and presents the installation process in a more generic way. Please read it first or have it along while following this guide.
For this guide, we used a desktop workstation equipped with the following hardware:
We acknowledge that it is already a high-end system, which may not represent the typical astrophysicist workstation. It is also far from a large compute GPU server. While some parts of this guide may not directly apply to your system, it should still accurately represent the installation process.
We used an Ubuntu 20.04 LTS image available at the time (ubuntu-20.04.4-desktop-amd64.iso dated from 2022-02-23).
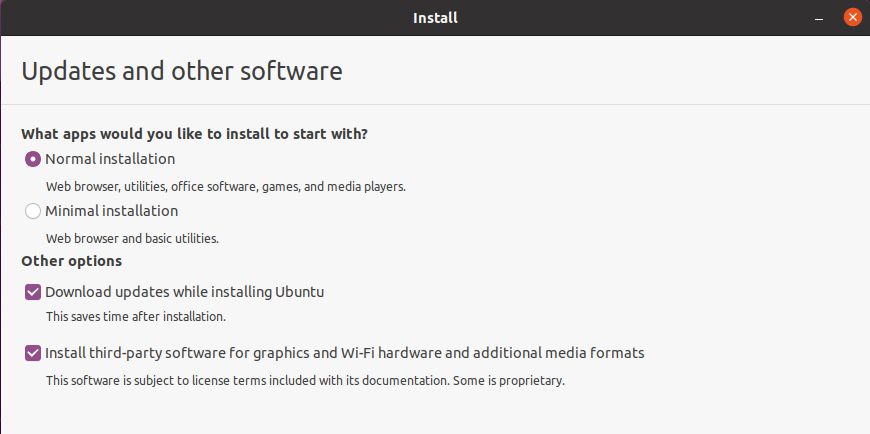
During the installation process, we advise checking the "update during install" and the "installation of third-party software". This will result in a more stable system at first startup with an already installed NVIDIA graphical driver (that can be updated later).
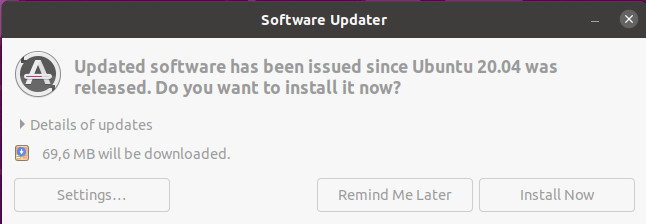
At the first system startup, the Software Updater will prompt to update the system and restart, which is strongly advised.
After restarting the system, we manually check that everything is up to date through the package manager in the console with:
sudo apt update
sudo apt upgrade
It may require another reboot if the commands update some packages.
To clone CIANNA, we first need to install git and then use the clone command:
sudo apt install git
git clone https://github.com/Deyht/CIANNA.git
The minimum dependency for CIANNA using the C_NAIV compute method is a C compiler:
sudo apt install gccWhile the install script was designed with GCC in mind, other compilers should work just fine. Note that it might require a few changes in the compile.cp script.
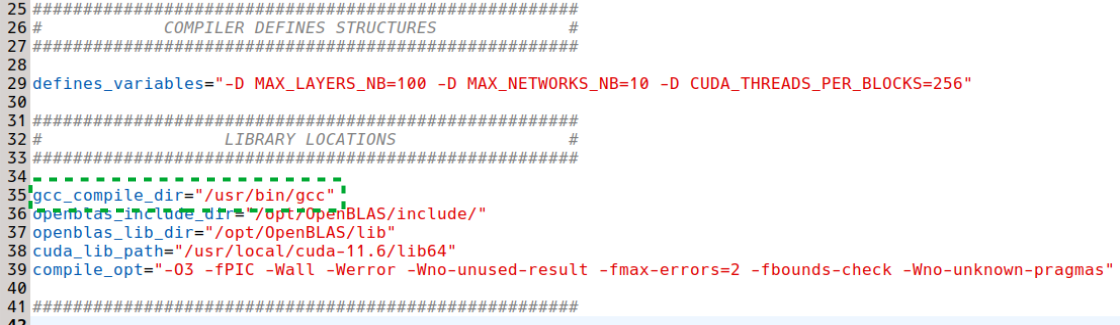
Before compiling CIANNA using the compile.cp script, we verify that it is set up with the appropriate path for gcc (here it is the default path, but your mileage may vary). The other paths can be ignored for now, as they are not used for the C_NAIV only compilation.
Now we can attempt a first simple compilation of CIANNA.
./compile.cpThis will build an executable called main, but it will not work as it is. First, we would need to modify the src/main.c source file, replace the C_CUDA compute method in the init function with C_NAIV, and then recompile CIANNA. It is also dependent on data files that are downloaded by the MNIST Python example.
While it is possible to use CIANNA in pure C, using the Python interface is strongly advised. The interface takes the form of a library (similar to Keras) that allows the construction and training of custom network architectures by calling CIANNA's high-level generic functions. Python can also be very practical for handling datasets in various formats and then handing them to the CIANNA interface.
The Python interface depends on the following packages:
sudo apt install python3-dev
sudo apt install python3-numpy
sudo apt install python3-setuptools
While it is usually easier and safer to install Python packages using pip, the library compilation requires NumPy to be installed at the system level.
To compile the interface, we need to add the PY_INTERF parameter to the compile command. Additionally, since the NAIV compute method supports CPU parallelization through OpenMP (which is included with GCC), we can include the corresponding parameter in the compile command (optional).
./compile.cp OPEN_MP PY_INTERFThe next step is to execute the Python example script, but we must first modify it for use with the C_NAIV compute method.

Then we need to decompress the provided MNIST data archive :
tar -xvzf mnist.tar.gzTo use the multi-threaded capabilities of the C_NAIV compute method, the following environment variable must be defined:
export OMP_NUM_THREADS=12For our workstation, 12 is the number of physical cores on the CPU. This information can be obtained using the lscpu command.
Finally, we can execute the example script :
python3 ex_script.py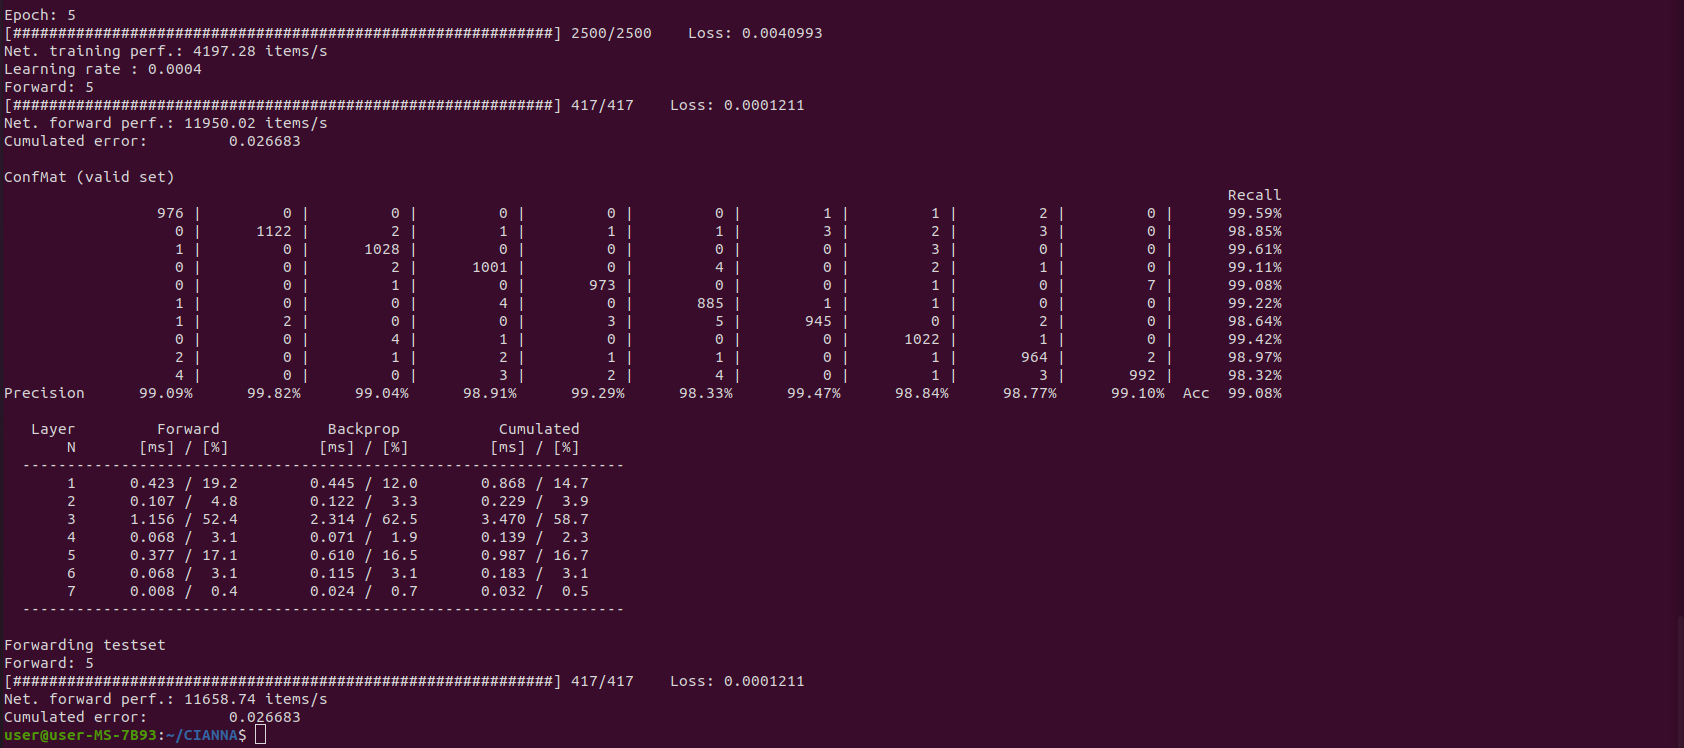
The exact results provided by the confusion matrix are of relatively low importance here. Only 10 to 20 epochs are insufficient to guarantee convergence, and the actual results can vary significantly from one training to another. There is no relation between the computing method in use and the obtained accuracy (at least for the examples presented in this guide). The output result is presented here to compare the raw compute performance between the different computing methods. The interesting numerical performance metrics are "Net. training perf" and "Net forward perf", as well as the detailed performance analysis shown in the last table.
The C_NAIV compute method is mainly maintained for pedagogical reasons. In contrast, the C_BLAS compute method aims to provide decent real-world performance on multi-core CPUs by using matrix formalism. For this, it relies on combining the OpenBLAS library for the supported operations and OpenMP directives for the rest.
While there is an OpenBLAS package manager installation (libopenblas and libopenblas-dev) that would work with CIANNA, OpenBLAS strongly benefits from local compilation, allowing CPU-specific optimizations to be enabled. Also, we advise forcing it to use OpenMP (instead of pthreads) so the number of execution threads used by OpenBLAS and CIANNA can be controlled over a single environment variable (it also reduces latency in some cases).
We start by cloning the latest version of OpenBLAS:
cd ~/
git clone https://github.com/xianyi/OpenBLAS
There are two dependencies required for OpenBLAS to compile:
sudo apt install make
sudo apt install gfortran
We compile OpenBLAS with the following command :
Note: OpenBLAS is a heavy library to compile, it will take several minutes even on a modern high-end CPU
cd OpenBLAS
make USE_OPENMP=1
Now that the library is compiled, we want to deploy it system-wide (it is optional for use only with CIANNA, but it is still advised).
sudo make installFinally, we must update the PATH and LD_LIBRARY_PATH environment variables so every program can find OpenBLAS at compile and execution time. One solution for this is to add export command lines in the .bashrc file so the path variables are updated at every terminal startup.
gedit ~/.bashrc &Add the following at the end of the file:
export PATH=/opt/OpenBLAS/include${PATH:+:${PATH}}
export LD_LIBRARY_PATH=/opt/OpenBLAS/lib${LD_LIBRARY_PATH:+:${LD_LIBRARY_PATH}}
For this modification to take effect, we need to restart the terminal (simply close and open a new one) or source the new bashrc file.
Now, to compile and run CIANNA with OpenBLAS, the corresponding paths must be updated in the compile and Python setup scripts:
cd CIANNA
gedit compile.cp src/python_module_setup.py &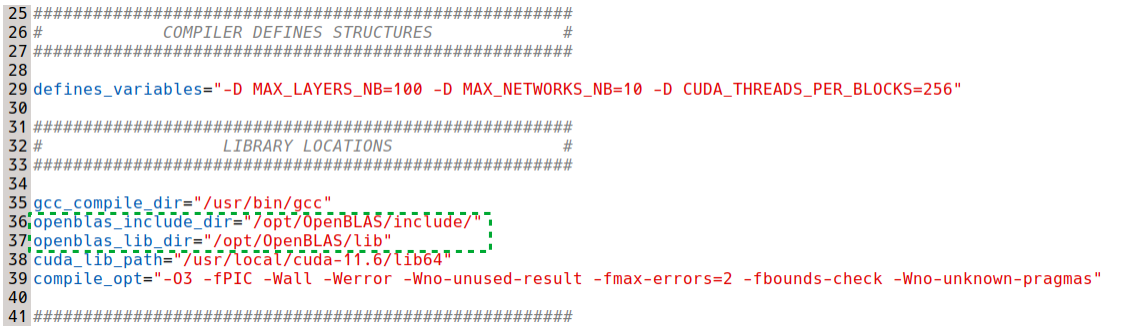

The BLAS parameter option can now be added to the compile script execution to allow the use of both C_NAIV and C_BLAS compute methods:
./compile.cp BLAS OPEN_MP PY_INTERFThe C_BLAS compute method is then to specify in ex_script.py in place of C_NAIV:

As before, the number of threads has to be specified by the environment variable OMP_NUM_THREADS, which will be used by both OpenMP and OpenBLAS. (If you used the package manager installation of OpenBLAS or have a classic non-OpenMP installation, you also have to set the OPENBLAS_NUM_THREADS environment variable.)
export OMP_NUM_THREADS=12
python3 ex_script.py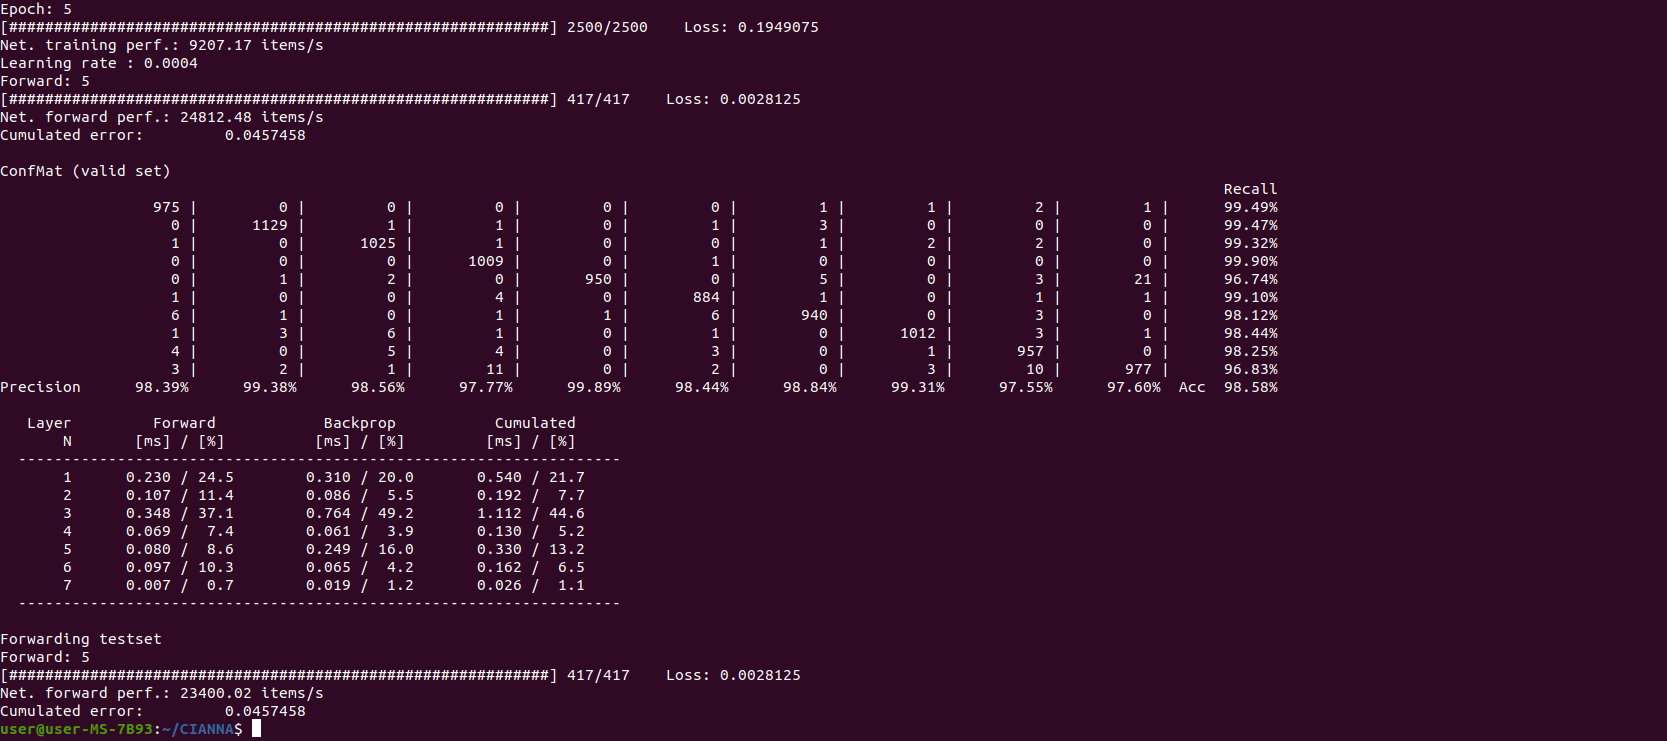
We observe that, on this specific architecture, CIANNA is more than 2x faster with the multi-threaded C_BLAS compute method than with the multi-threaded C_NAIV one. The detailed performance table also shows that the relative time spent for the 2nd convolutional layer is significantly lower than with C_NAIV, confirming that the OpenBLAS library scales better on larger matrix computations.
While decent CPU performance can be obtained using CIANNA, only minor optimization investments were made to get the performance on par with widely adopted frameworks. Still, when matrix operations dominate the execution time, which is the case for most large networks, and when used with a relatively large batch size, the CPU version's performance is very similar to that of other frameworks.
In contrast, the development of CIANNA is strongly focused on the GPU version's performance using CUDA, including the latest machine learning and deep learning optimizations, as well as dedicated hardware functionalities.
For this reason, we strongly recommend using CIANNA on a workstation or server equipped with a GPU. In such a context, the performances are very similar to those of other well-known frameworks (and even higher for some specific architectures). Note that CIANNA currently only supports NVIDIA GPUs.
WARNING:This guide presents one possible approach for installing CUDA on a desktop system with a single GPU that also handles display. The installation process might differ significantly for systems equipped with both an iGPU and a dGPU (laptops) or for servers with multiple GPUs but not responsible for display.
PROCEED WITH THIS GUIDE AT YOUR OWN RISK, knowing that incorrect actions might result in a non-functioning video driver and, therefore, no graphical environment available to correct it. We strongly recommend a full data backup if you plan on installing all of the following on your daily system. Plenty of documentation on how to properly install CUDA can be found online; we recommend searching for one that matches your system.
To proceed, one must identify which CUDA version is compatible with its configuration - check it on the CUDA installation guide and CUDA compatibility page. Various parameters can impact the maximum version you can target, especially if you want to perform a local installation of CIANNA on a system without admin rights (Linux kernel/OS version, dependency versions, and the latest Nvidia driver available for your system).
The first step is to install the most up-to-date compatible driver for your configuration, which is 510.54 in our case (if your driver is already compatible with the aimed version of CUDA and you have a working system, it might not be necessary to update the Nvidia driver, but you might leave some performance on the table). We recommend using Ubuntu's Software & Updates tool to avoid conflict and allow automatic driver updates in the future.
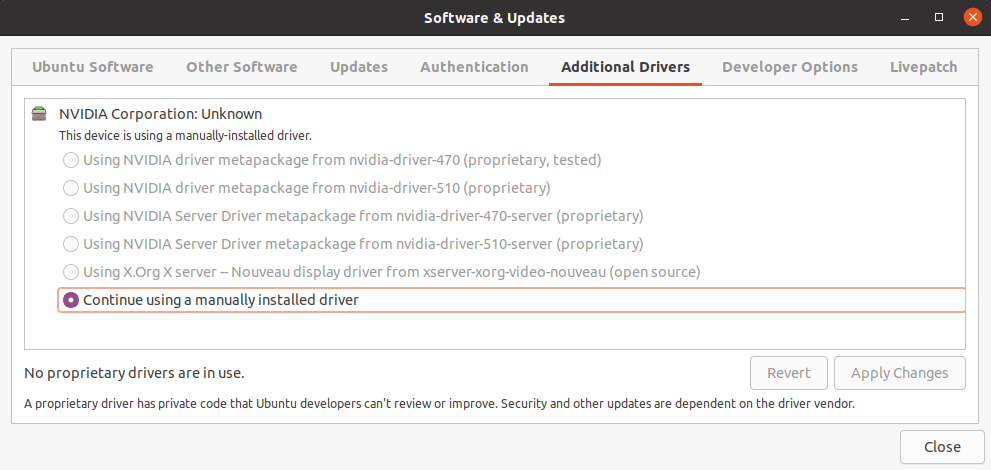
In our case, the software indicates that we have already manually installed a driver (specifically the 470 driver), which is due to our decision to install third-party software during the Ubuntu installation process. Still, we can force the change through the package manager and obtain the same result. After installing a graphical driver, it is strongly recommended that the system be rebooted.
sudo apt install nvidia-driver-510
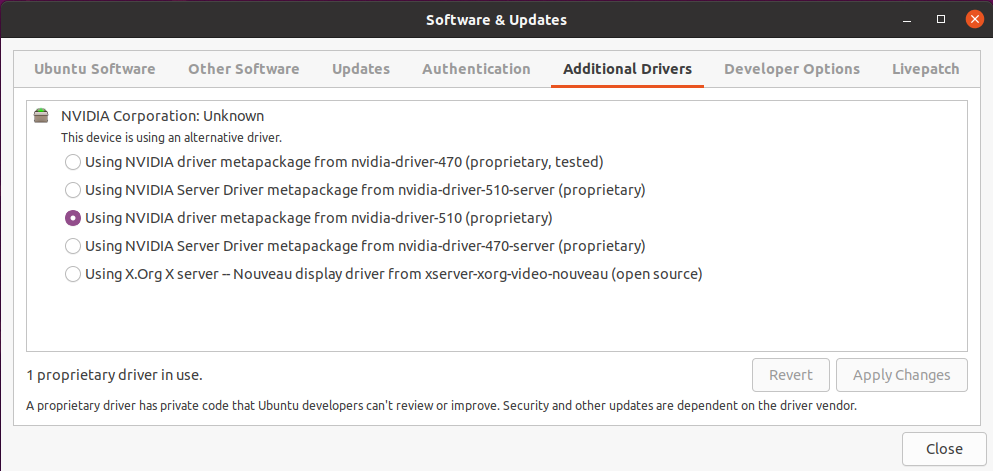
sudo rebootWe then verify that the change is operational in the Software & Updates utility.
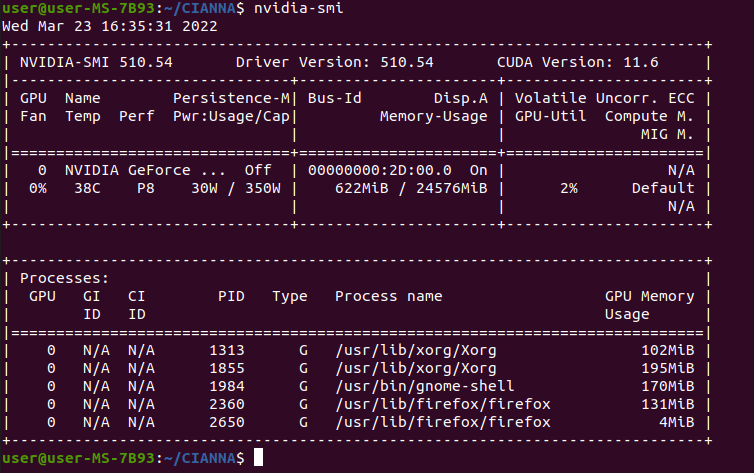
It may also be helpful to verify that everything is running smoothly at the GPU level by using the nvidia-smi command, which should have been installed with the driver (in the NVML package).
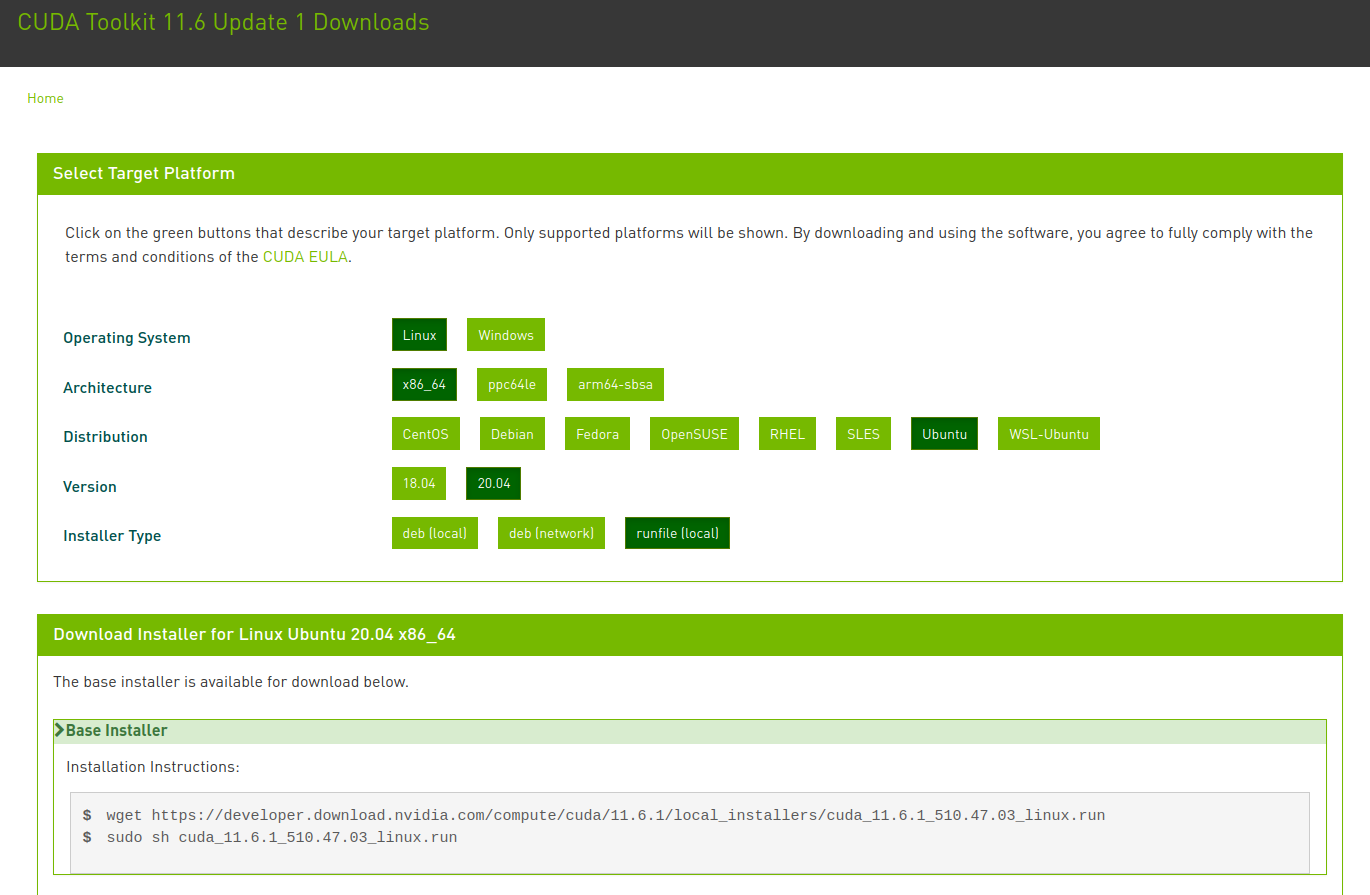
The next step is to install CUDA itself. While there are some package manager versions for Ubuntu, we do not recommend this approach. Instead, we use the runfile install directly downloaded from the NVIDIA website. We found this type of installation to be more stable in time, and it has the advantage of allowing multiple CUDA installations with different versions on the same system more easily. This is also a suitable way of installing CUDA locally without needing admin rights on the system (only if a compatible NVIDIA driver is already installed).
The runtime installer for the latest CUDA version can be downloaded from this page.
The download and launch of the installation script can be done using :
cd ~/Downloads
wget https://developer.download.nvidia.com/compute/cuda/11.6.1/local_installers/cuda_11.6.1_510.47.03_linux.run
chmod u+x cuda_11.6.1_510.47.03_linux.run
sudo ./cuda_11.6.1_510.47.03_linux.run
Warning: The script may take some time to provide feedback; this is perfectly normal.
One of the first messages from the install runtime will certainly be a warning about a package manager NVIDIA driver installation being found. This warning can be ignored, as this is deliberate in our case, and we will prevent the attached driver installation from happening.
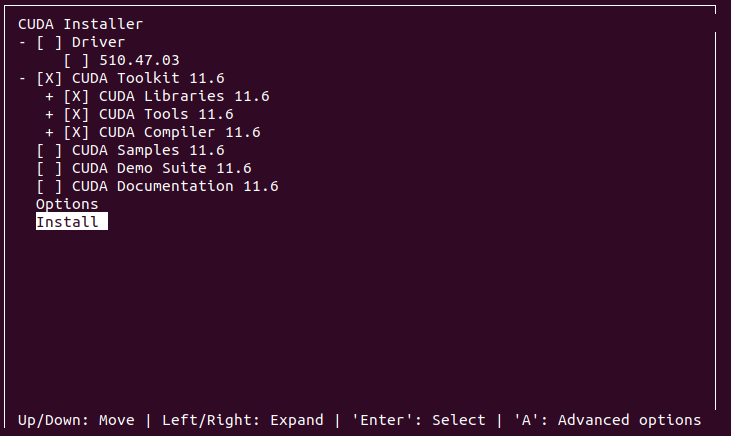
The next important step is to deselect the driver installation when prompted. The only required component is the CUDA toolkit and all its content. Samples, Demo Suits, and Documentation are all optional and left to your preference.
After the installation, a message will specify that you need to manually update both PATH and LD_LIBRARY_PATH for your new CUDA installation, just as we did for OpenBLAS, by updating the corresponding lines at the end of the ~/.bashrc file.
export PATH=/usr/local/cuda-11.6/bin:/opt/OpenBLAS/include${PATH:+:${PATH}}
export LD_LIBRARY_PATH=/usr/local/cuda-11.6/lib64:/opt/OpenBLAS/lib${LD_LIBRARY_PATH:+:${LD_LIBRARY_PATH}}
The terminal must be closed, and a new one opened for the changes to take effect (or source the modified ~/bashrc file).
One can then check if the NVIDIA CUDA compiler is found :
nvcc --versionNow that we have a working CUDA installation, we can compile CIANNA using the C_CUDA compute method. As before, the first step is to verify the compilation and Python interface installation scripts. But this time, there are several parameters to verify.
cd CIANNA
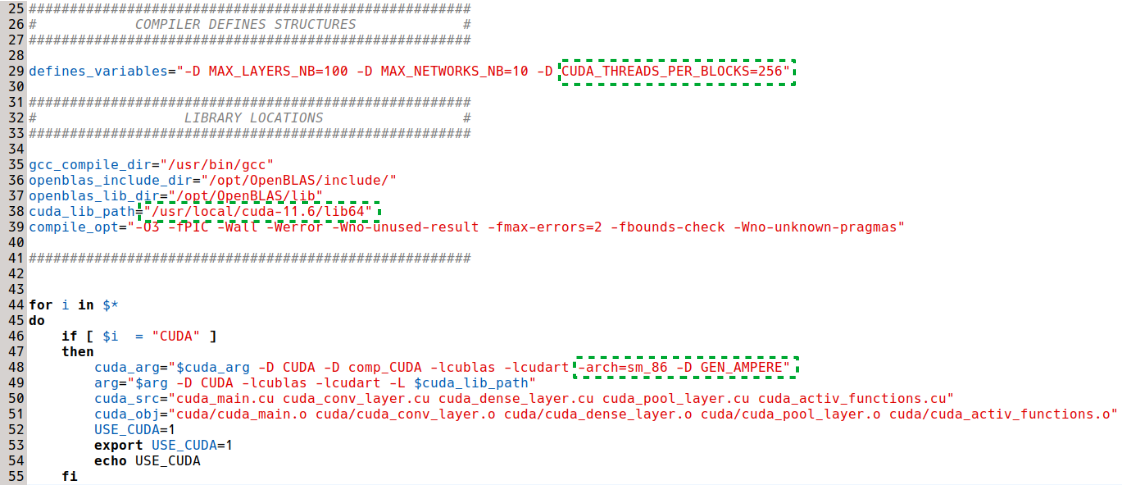
gedit compile.cp src/python_module_setup.py &The paths for the CUDA lib64 and NVCC compiler must be specified. In addition, it is necessary to adapt the global variable CUDA_THREADS_PER_BLOCKS to your GPU: the larger the GPU (in terms of available CUDA cores), the higher the value should be, but it should also be low enough to ensure good GPU occupancy for a wider variety of cases. In practice, this variable can be set empirically to maximize performance for your specific GPU / workflow. We found that a value of 256 works well for most of our workflows on this GPU. Additionally, it is necessary to adjust the arch_sm value to match your specific GPU. Correspondence tables are available online, but the arch_sm value should always be equivalent to the "compute capability" of your specific GPU, which is easier to find. For the RTX 3090 Ampere, the compute capability is 8.6, corresponding to -arch=sm_86. The other global variable set at compile-time specifies the generation of the GPU in terms of support for Tensor Core usage. Details are provided on the Installation instructions and pages. For this system, the appropriate keyword is GEN_AMPERE.

For the Python installation script, we must specify the CUDA_THREADS_PER_BLOCKS value (identical to the one in compile.cp) and the CUDA paths.

Now that everything is set up properly, we can compile CIANNA with all the compute methods activated (we could also compile it only for CUDA).
./compile.cp CUDA BLAS OPEN_MP PY_INTERFThis time, instead of launching the script directly, we will first deploy the complete version of the CIANNA Python interface system-wide.
cd src/
sudo python3 python_module_setup.py install
cd ..
It means that, in ex_script.py, we can now comment out lines 4 and 5 as the import CIANNA command will work from everywhere as a regular library.
To use the C_CUDA compute method, we also need to specify it in the init function of the Python example script, replacing C_BLAS or C_NAIV.

We can finally execute the example script with CUDA acceleration :
python3 ex_script.py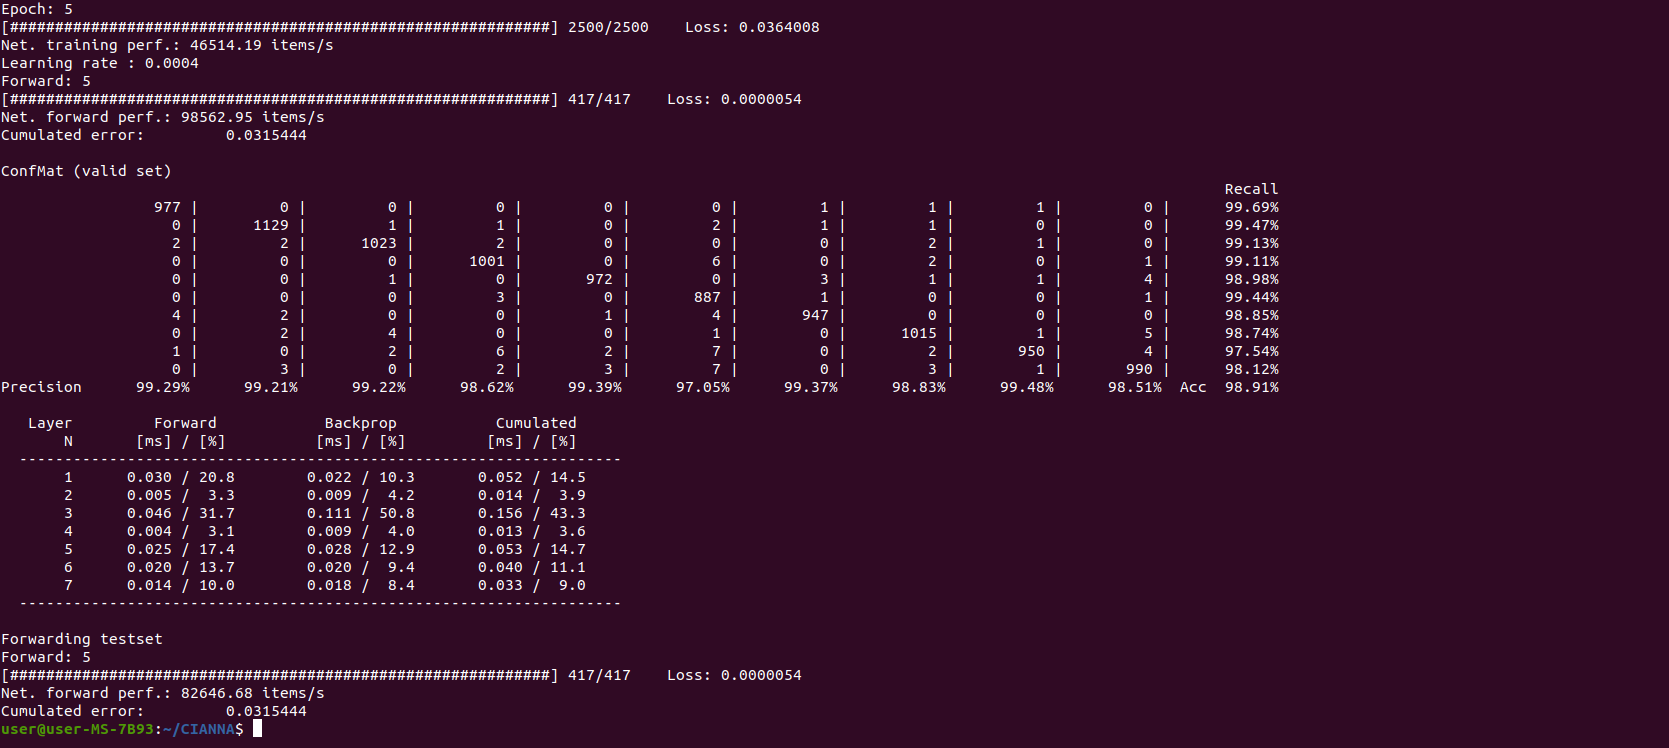
We observe that, on this specific architecture, CIANNA is more than 5x faster with the GPU compute method than with the multi-threaded C_BLAS one. However, we are comparing two different hardware this time, which is quite unfair. Still, it would require an already large computing server to match the performance of a single RTX 3090.
Finally, since we are using an Ampere GPU, we can test the performance gain using Mixed Precision with Tensor Core acceleration by specifying it in the init function. In practice, the gain will depend on the actual bottleneck of the network (network architecture, programming, memory speed, compute speed, etc). On the default ex_scrip architecture, there is almost no gain in using mixed precision with a lower bit count datatype since it is mainly latency-dominated at this point. To observe a speedup, we change it to a bigger one:
cnn.conv(f_size=i_ar([5,5]), nb_filters=32, padding=i_ar([2,2]), activation="RELU")
cnn.pool(p_size=i_ar([2,2]), p_type="MAX")
cnn.conv(f_size=i_ar([5,5]), nb_filters=64, padding=i_ar([2,2]), activation="RELU")
cnn.pool(p_size=i_ar([2,2]), p_type="MAX")
cnn.dense(nb_neurons=256, activation="RELU", drop_rate=0.5)
cnn.dense(nb_neurons=128, activation="RELU", drop_rate=0.2)
cnn.dense(nb_neurons=10, activation="SMAX")
And we then compare the result between FP32C_FP32A:
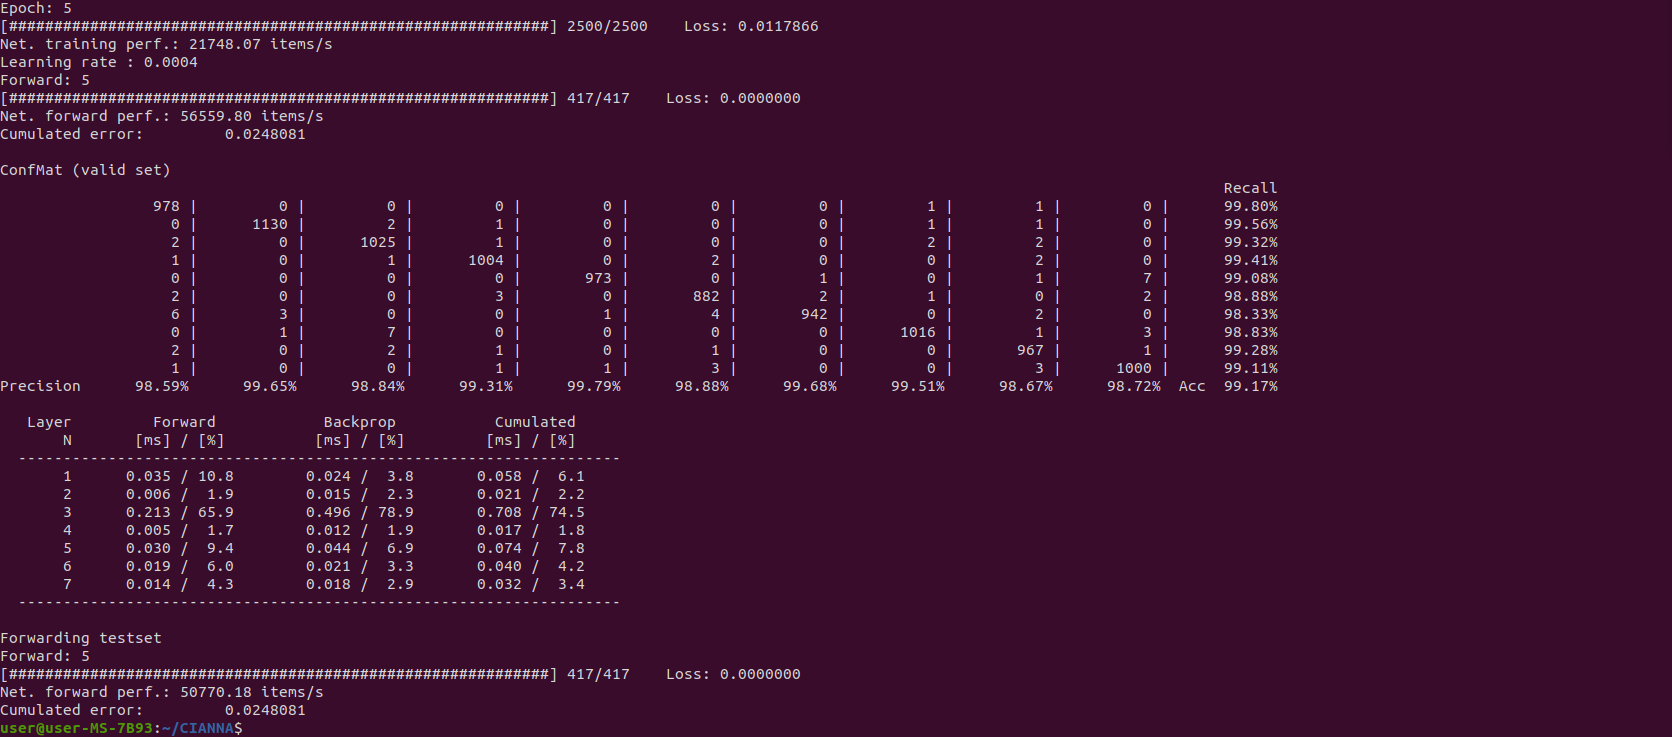
against BF16C_FP32A:

With this architecture, the Mixed Precision with Tensor Cores activated provides a 60% performance improvement with identical prediction accuracy. This is already significant, but depending on the workflow, the gain could be even better, up to 3-4 times the training speed.